Identifying Damage on Your Lightning McQueen Diecast
Owning a Lightning McQueen diecast car is a joy, but accidents happen, and damage is inevitable. Whether it’s a childhood favorite or a prized collector’s item, understanding the extent of the damage is the first crucial step in restoring your cherished vehicle. Careful inspection can reveal the types of damage, allowing you to select the most appropriate repair techniques and supplies. Proper assessment saves time, prevents further damage, and ensures a better restoration outcome. Take your time and examine every inch of the diecast, considering the common vulnerabilities. The more detailed your initial inspection, the more successful your repair will be, and the better your Lightning McQueen will look when the work is complete.
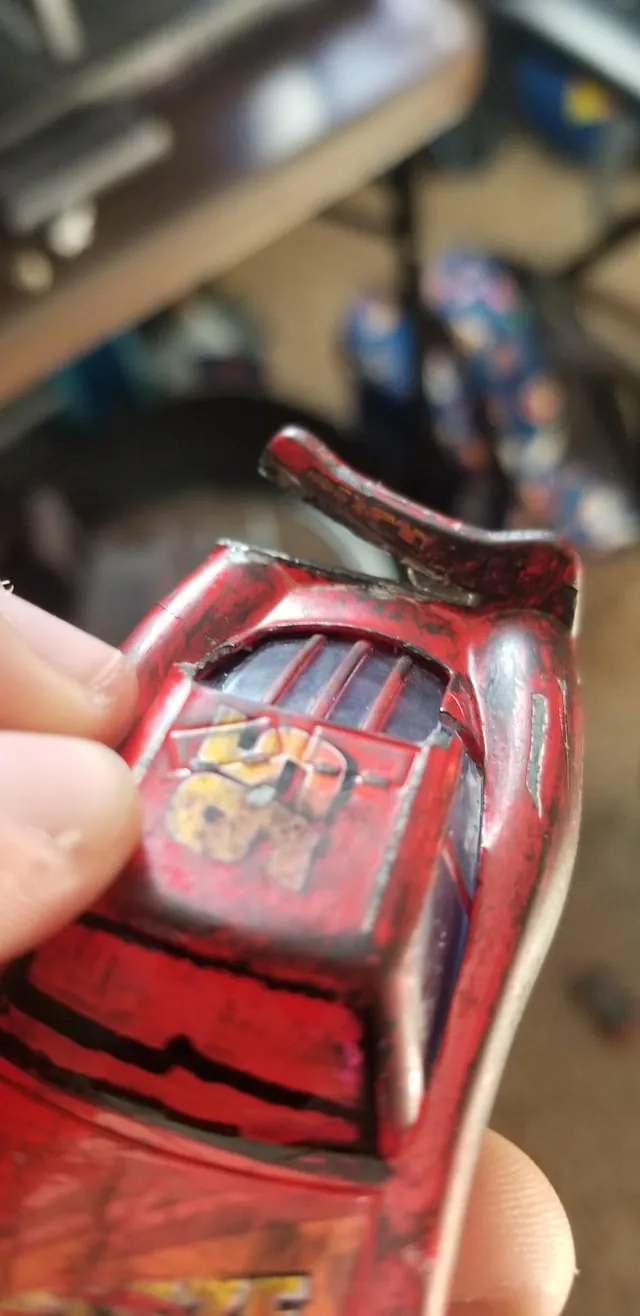
Common Types of Damage
Diecast cars, including Lightning McQueen, are susceptible to various types of damage that can detract from their appearance and value. Being aware of the typical problem areas will assist in the inspection process and help determine the best course of action. Common issues range from superficial blemishes to more serious structural problems. The following outlines the most frequent types of damage you’re likely to encounter and prepare you for the repair process. This will help you properly assess the repair needs for your damaged Lightning McQueen diecast car and determine how to best proceed with restoration.
Paint Chips & Scratches

Paint chips and scratches are the most common forms of damage on diecast models. These occur from impacts, friction, or simply from the car being handled. Small chips can expose the metal underneath, leading to potential rust if not addressed. Scratches can range from superficial marks to deep gouges that remove the paint entirely. Proper assessment involves evaluating the depth and extent of the damage. Minor scratches might be touched up, while larger areas may require complete repainting. Matching the original color is critical to maintaining the model’s value and aesthetics. Examine the affected areas under good lighting to determine the appropriate repair strategy and assess the supplies needed for a seamless finish, restoring your Lightning McQueen to its former glory.
Dents & Warping
Dents and warping occur from impacts or exposure to extreme temperatures. Dents usually result from a direct impact, creating an indentation in the metal. Warping occurs when the metal bends out of shape, usually from heat exposure. This can affect the car’s overall structure and aesthetic. Identifying these issues involves careful observation of the car’s shape and alignment. Look for any areas that are misshapen or no longer straight. Repairing dents and warping often involves careful manipulation of the metal, sometimes requiring heat and specialized tools. Addressing these issues is vital for restoring the original form of your Lightning McQueen diecast and improving its overall appearance. Ensure the vehicle is handled carefully during these processes to avoid additional damage.
Broken Parts
Broken parts are a more serious form of damage and can significantly impact the diecast’s appearance and functionality. These can range from minor issues, like a detached side mirror, to major problems, such as a broken chassis. Identifying broken parts involves a close inspection of all components. Examine the wheels, axles, mirrors, and any other detachable parts to ensure they are intact. Repairing broken parts often requires finding replacement parts, which can be challenging, especially for rare models. Once replacement parts are available, they can be reattached using adhesives or other appropriate methods. Careful handling and patience are essential to ensuring a successful restoration that restores the value of your Lightning McQueen.
Top 5 Repair Tips

Restoring a damaged Lightning McQueen diecast can be a rewarding project, bringing new life to a cherished collectible. The following five tips will guide you through the repair process, helping you achieve professional-looking results and restore your diecast to its original glory. These tips cover the essential steps, from initial preparation to the final touches. By following these guidelines, you can successfully address various types of damage and enjoy the satisfaction of a beautifully restored Lightning McQueen model. Each tip highlights a crucial aspect of the restoration process and gives you the knowledge you need to be successful, including selecting supplies, and preserving the diecast’s value.
Cleaning and Preparing the Diecast
Before beginning any repair, thoroughly clean your Lightning McQueen diecast car. This step removes dirt, dust, and any loose debris that could interfere with the repair process. Use a soft brush or a damp cloth to gently clean the surface of the car. Pay attention to crevices and hard-to-reach areas where dirt can accumulate. For tougher grime, you can use a mild soap solution, but make sure to rinse the car completely and dry it thoroughly. Proper cleaning is essential to ensure that any adhesives or paints applied adhere correctly. Preparing your diecast car in this way will set the stage for a successful restoration and ensure the best possible results. This will also help you identify the extent of the damage.
Gathering Your Supplies
Having the right supplies is crucial for a successful diecast car repair. The necessary items depend on the type of damage you’re addressing, but some essentials include fine-grit sandpaper, primer, matching paint, clear coat, and various adhesives. You may also need specialized tools, such as a heat gun for warping, or small brushes and detail tools for applying paint. Make sure to obtain a color match for your Lightning McQueen by either using the original paint codes or by taking your car to a professional paint supplier. Also, gather safety gear, such as gloves and eye protection. Having all supplies on hand before you start the repair ensures that the process flows smoothly and efficiently, and that the end results meet the necessary standards for your Lightning McQueen diecast car.
Repairing Paint Chips & Scratches

Repairing paint chips and scratches is a fundamental aspect of diecast restoration. Start by cleaning the damaged area to remove any loose paint or debris. Then, use fine-grit sandpaper to gently smooth out the edges of the chip or scratch. This step creates a smooth surface for the new paint to adhere to. After sanding, apply a thin layer of primer to the exposed metal. Once the primer is dry, carefully apply matching paint in thin coats. Allow each coat to dry before applying the next. Finish by applying a clear coat to protect the new paint and give it a glossy finish. With careful attention to detail, you can restore the original appearance of your Lightning McQueen diecast car.
Using Fine-Grit Sandpaper
Using fine-grit sandpaper is a critical step in repairing paint chips and scratches. Choose a grit size between 1000 and 2000 for the best results. Gently sand the affected area, focusing on feathering the edges of the chip or scratch to create a smooth transition. Avoid sanding too aggressively, as this can cause further damage. The goal is to level the surface and remove any sharp edges without removing too much paint. After sanding, wipe away any dust and debris. This will prepare the surface for priming and painting. Proper sanding ensures that the new paint adheres correctly and provides a professional-looking finish for your Lightning McQueen diecast.
Applying Matching Paint
Applying matching paint is key to a seamless repair. Before applying the paint, ensure the surface is clean, primed, and smooth. Using a fine-tipped brush or a small airbrush, apply thin, even coats of paint to the damaged area. Allow each coat to dry completely before applying the next. Multiple thin coats are better than a single thick coat, as they provide a more even finish and reduce the risk of drips or runs. Take your time and be patient, as this step requires precision and attention to detail. Once the paint is dry, apply a clear coat to protect the new paint and add a glossy finish, ensuring that your Lightning McQueen diecast looks as good as new.
Addressing Dents & Warping

Addressing dents and warping can be more complex and often requires specialized techniques and tools. For minor dents, you might be able to carefully push the metal back into shape using a specialized tool. For warping, the application of heat may be necessary. Use a heat gun on a low setting and carefully apply heat to the affected area. Once the metal is warm, gently reshape it, using tools like pliers or specialized shaping tools. Be cautious when using heat, as excessive heat can damage the paint. After reshaping, allow the metal to cool completely before proceeding. This process requires patience and precision, but it can restore your Lightning McQueen diecast’s original shape.
Using Heat to reshape
Using heat to reshape a damaged diecast requires caution and precision. A heat gun is a preferred tool for this, as it allows you to control the temperature. Apply heat to the dented or warped area, moving the heat gun in a circular motion to avoid overheating any single spot. Monitor the metal closely and stop heating when it becomes pliable. Then, use specialized tools, such as metal shaping tools, to gently reshape the metal back to its original form. Be extremely careful not to burn the paint or damage the diecast further. Once the metal has been reshaped, allow it to cool completely before proceeding. This method can restore your Lightning McQueen diecast’s original form and improve its appearance significantly.
Replacing Broken Parts
Replacing broken parts can be a challenging but rewarding part of the restoration process. The first step is to identify the exact part that needs replacement. Then, try to find a replacement, which may involve searching online, at hobby shops, or even repurposing parts from a similar diecast. Once you have a replacement part, carefully remove the damaged part and prepare the area for the new installation. You might need to use adhesives, such as super glue or epoxy, to secure the new part in place. Make sure the new part is correctly positioned and aligned before the adhesive sets. The process requires attention to detail, and patience, and will significantly improve the overall appearance of your Lightning McQueen diecast.
Finding Replacement Parts

Finding replacement parts can be the most challenging aspect of restoring a damaged diecast. Start by identifying the exact part you need. Then, search online marketplaces, such as eBay, for potential replacements. Consider checking online forums and communities dedicated to diecast collecting, where members may have spare parts or offer guidance. Local hobby shops can also be a valuable resource, as they might stock replacement parts or know where to source them. If you are unable to find a direct replacement, you might be able to adapt or repurpose a part from another diecast car. Patience and persistence are key when sourcing replacement parts for your Lightning McQueen diecast.
Gluing Parts
Gluing parts is a crucial step in the repair process, ensuring that replacement or repaired components are securely attached. Choose an adhesive appropriate for the materials involved, such as super glue for small parts or epoxy for more significant repairs. Clean the surfaces to be joined and apply a small amount of adhesive to one or both parts. Carefully align the parts and hold them in place until the adhesive sets. Depending on the adhesive, this could take a few seconds to several minutes. Remove any excess adhesive and allow the joint to cure completely. This will secure the parts and will help with your damaged Lightning McQueen diecast restoration.
Protecting Your Repaired Diecast
Once the repairs are complete, protect your Lightning McQueen diecast from future damage. Applying a clear coat can protect the new paint and give it a glossy finish. Store your diecast in a cool, dry place away from direct sunlight to prevent fading and damage. Consider using a display case or protective cover to shield your model from dust and accidental impacts. Regularly inspect your diecast for any signs of damage and address them promptly. Taking these steps will help preserve the value and appearance of your restored Lightning McQueen for years to come.
Displaying Your Restored Lightning McQueen

Displaying your restored Lightning McQueen diecast allows you to showcase your restoration efforts and share your passion with others. The display method enhances the aesthetic value and can protect the diecast from damage. Consider several display strategies that will protect your restored diecast and showcase it beautifully. From choosing the correct location to ensuring that the diecast is well-maintained, a proper display can transform a restoration project into a true centerpiece.
Best Display Practices
Implementing the best display practices will help you maintain the value and beauty of your restored Lightning McQueen diecast. The best methods include using a display case to protect the model from dust and accidental damage. Arrange the display in a location away from direct sunlight to prevent fading. You can also organize your collection by theme, scale, or brand to create a visually appealing display. Regular dusting and cleaning will keep your diecast looking its best. By following these practices, you can create a display that showcases your collection and protects your investment for years to come.
Avoiding Direct Sunlight
Avoiding direct sunlight is critical to preserving the color and condition of your restored Lightning McQueen diecast. Direct sunlight can cause the paint to fade and the plastic to deteriorate over time. Choose a display location away from windows or other sources of direct sunlight. If you must display your diecast in a sunny area, consider using a UV-protective display case. This will help block harmful UV rays and keep the colors vibrant. Protecting your Lightning McQueen from direct sunlight will help ensure it remains a cherished collector’s item for many years.
Regular Cleaning

Regular cleaning is essential for maintaining the pristine condition of your restored Lightning McQueen diecast. Dust and debris can accumulate on the surface, detracting from its appearance. Gently dust the diecast regularly using a soft brush or microfiber cloth. For more stubborn grime, you can use a slightly damp cloth. Avoid using harsh chemicals or abrasive cleaners, as these can damage the paint and finish. Regular cleaning will keep your Lightning McQueen looking its best and will help to prevent the build-up of dirt and grime, ensuring it remains a prized item in your collection.